First, I would like to thank all of you for your constructive feedback, ideas and wishes over the last few months which helped enormously to take another big step towards making Ableton Live from the best and most stable DAW to a great tool for orchestration with VST instruments as well!
A special thank you goes to Claire, Elias, Andrew, Enrique, Alex, Steve, Kim, Robin, Daniel, Susan and Norbert who are so kind to give in advance a little try to the beta version.
The official release is planned for the beginning of March 2021 and all users will receive automatically a download link by mail afterwards. I am still updating the manual!
Eight device controls for instant mapping
From now on, you can dynamically map your key switches and MIDI controls to your MIDI controller. The MIDI controls are organised in four banks. For a quick workflow, you can customise the first bank to group your most frequently used MIDI controls into eight device controls, as you know them from other devices in Ableton. The first dial lets you control additionally your key switches.
To use this option, you need Ableton Live 10 or 11 and your MIDI controller must be chosen as Control Surface in the preferences. In case that you do not know exactly what this is, have a look here. I still update the manual, but I have already uploaded a PDF with more information about this topic.

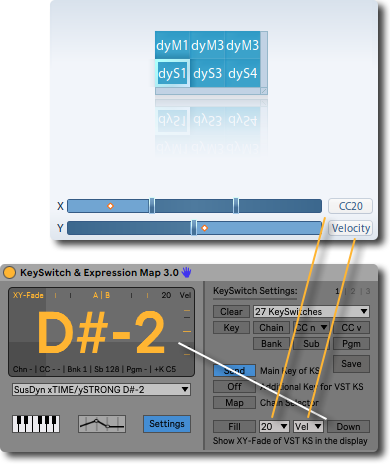
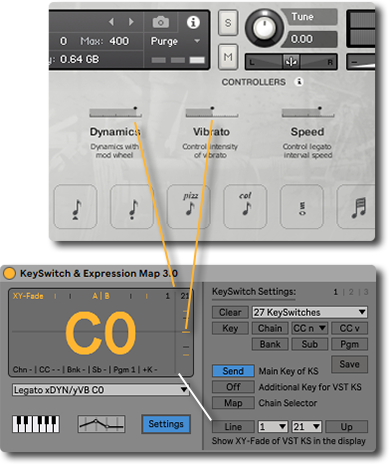
Show your XY-Faders in the display
If the player of your VST library offers you to xy-fade between articulations (e.g AB Switch for Runs Up or Down, Crescendo or Diminuendo / Crossfade from Sustain to Tremolo or Non Vibrato to Vibrato etc.), you can show the assigned velocity or CC values for a better overview in the display.
The yellow lines indicate 1/4, 1/2 and 3/4. The black lines 1/3 and 2/3.
You can change the shape of the XY-Faders and choose between a filled rectangle or a discreet line.
Furthermore, you are able to invert with the Up/Down-button the values of the Y-Fader to show the fader’s indicator accordingly to the layout of articulation slots in your VST-plug-in to avoid confusion.
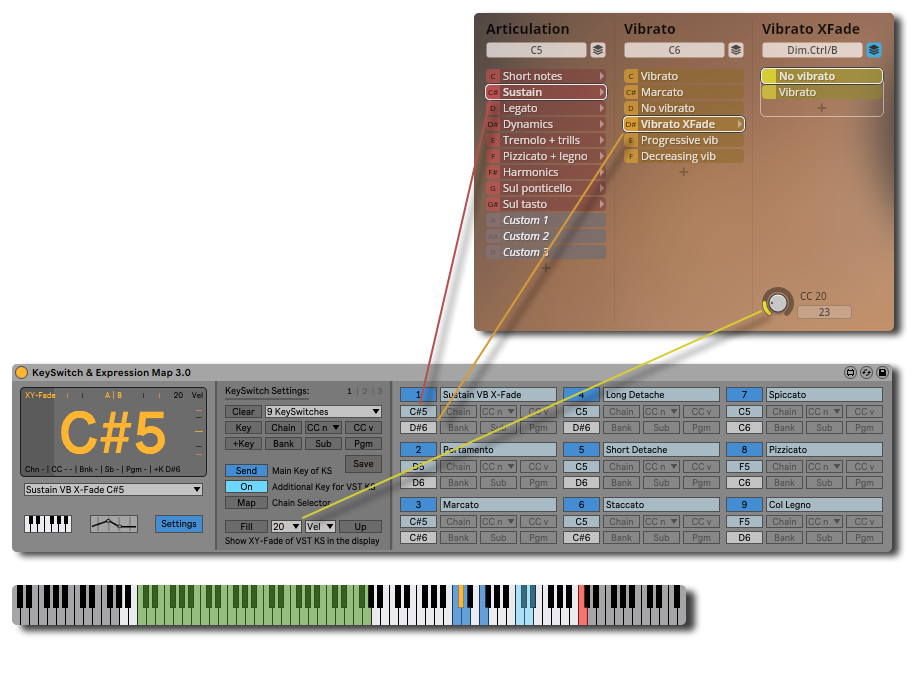
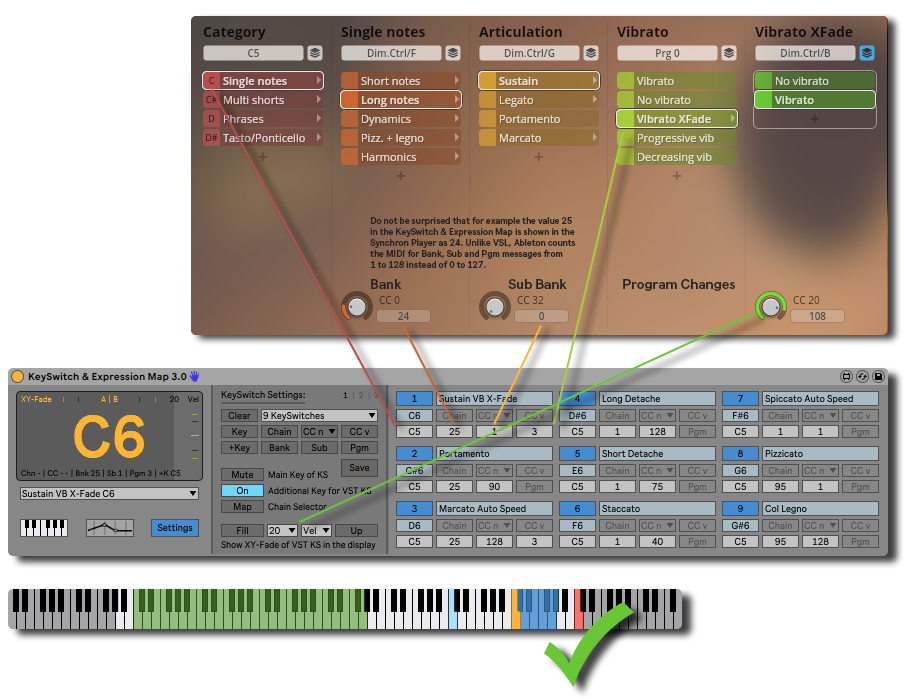
Additional Key
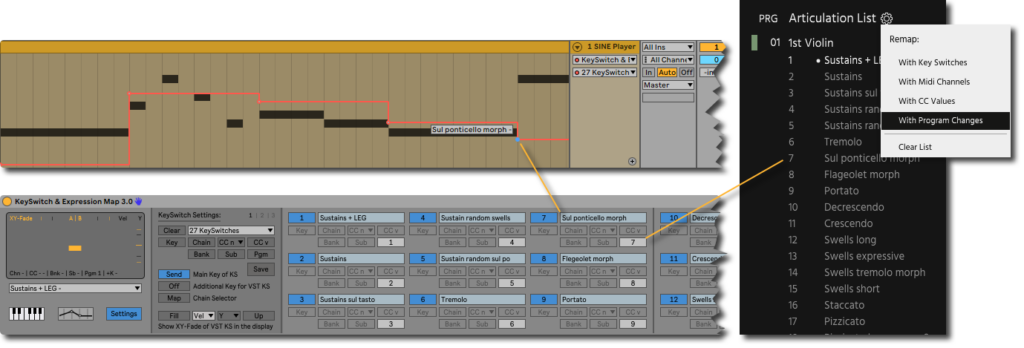
Some VST libraries work with combinations of multiple keys to switch matrices or dimensions. Although it has already been possible to control these kind of players remotely with the main key, program changes, bank (CC 0), sub (CC 32) and CC, with the additional key (+Key) you can either set up the folder and patch slots (parent and child slots) quicker or you use the additional key to keep the main key available for the KeySwitch & Expression Map to define own key switches for your piano.
Automatic Delay Compensation
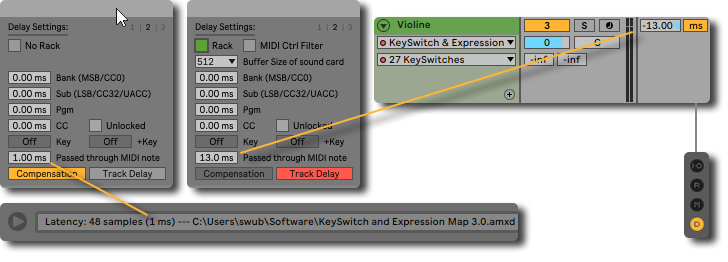
If you do not use a rack, the delay times are now compensated automatically by Delay Compensation which uses the defined latency of the patch to balance it out automatically. Just like other devices in Ableton Live, the currently set latency will be displayed in the status bar of Ableton when you hover with the mouse about the title bar of the device.
In case that you use a rack, you still have to compensate the delays manually with the track delay section to use Ableton’s option Chase MIDI notes. However, you can now choose between presets to find out quickly the perfect delay times for your set-up. They are named like Buffer Sizes because the necessary delay is connected to the preferences which are set for your sound card. The delays are chosen generously so that they should work out of the box for all users. Thus, you can try out as well shorter times if desired.
Please note that the delay times are only necessary if you want to manage your key switches automatically. In case that you play them solely live on your piano with the defined keys, you can set all delays to 0 ms because you will always press intuitively the key switch more than a few milliseconds in advance – unless you are a robot or at least a cyborg? Hence, no worries about any delay of the passed through MIDI note in this context! Without the defined delays, the device itself does not cause any latency.
Re-Enabling of Automations
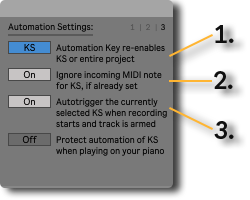
Three new features for automation envelopes have been added and with them a separate tab in the settings.
- You can choose whether the button should globally re-enable all automations of the entire project or only of the key switch.
- While pressing keys on your piano to record the automation envelopes for the articulations, the note of the key switch is as well captured into the MIDI clip. During playback, these notes can deactivate the automation envelope because they trigger the already set articulation a second time. To prevent this and to avoid that you have to manually delete the notes for the articulation after recording, you can activate this button.
- Last but not least, you can let the device trigger the currently selected key switch as soon as you start a recording. In this way, you can conveniently set an articulation before recording, even if the automation of the envelope for the keyswitch gets deactivated by the manual switching beforehand. If you are used to work with the MIDI Arrangement Overdub it might bother you. Leave it switched off then.
Memos on the surface of the piano
A list of 27 articulations can become a visual jungle of information – especially if you have just created the key switches or open an old project. It is only a very limited gadget (no backspace, eraser or save), but perhaps it could be for example useful to briefly draw a series of articulations for a recording on the surface of the piano. Alternatively, you can of course just use it to vent your anger after a failed recording through some kind of art therapy!

Optimised design
The design has been revised and now offers a better overview when setting up the key switches in all available colour schemes of Ableton Live. For this, the unselected parameters of a keyswitch are greyed out and remain visually in the background.
The virtual piano has also been given a new look and can now be displayed together with the MIDI controls. If you wish, you can minimise the area of the MIDI controls to only the eight device controls with the custom bank in order to save space.

No obligation to assign a key
If you want to control your key switches only with automation envelopes or your MIDI controller, there is no obligation anymore to define a note for your key switches to be able to save them. A name is enough!
Bye-bye bug!
When setting up the key switches, it has not been possible to enter the note with the computer keyboard – only with the mouse. This is now fixed.
I had to change the type of numbox for this though. Therefore, I would like to advise you to not update the device in your templates or projects if you are under time pressure due to a looming deadline! The parameters of your key switches will remain untouched but you have to re-enter the note. I’m sorry for the possible inconveniences:-( And to try quickly to smooth the waters … at least the update with all this new and fantaaaaastiiic features which you can always use from now on for your future projects is completely free of charge. Isn’t that great? It is, right? … I hope that it worked …
I wish you a lot of fun making music with the update and much success for your projects. If you have any further ideas or wishes, do not hesitate to write to me. Because if there is one thing I have learned from doing the support over the past year, it is that there are an insane number of completely different things you do with the Keyswitch & Expression Map and countless ways to work in Ableton Live. Therefore, you may notice or even be bothered by something that I will never discover, even though the KeySwitch & Expression Map has become a very dear and daily companion in my own compositions!
I myself, have at least one more idea on the wishlist which will come with the next update in summer.
Until then!
Yours swub.

